Google Docs is a powerful and versatile document-sharing platform. It enables you to do more than just type documents on the go or share them with other people through Google’s various sharing mechanisms. It can also be tailored for your specific needs, such as inserting tables that make data easy to read.
Tables allow you to format text, and organize that text in neat rows or columns. They are much more efficient than trying to organize your content in the normal document body and position it vertically or horizontally.
Vertical alignment of tables can be adjusted with ease so that all data points line up for an easy readout. Our article below will walk you through working with tables so that you can attain vertical alignment in Google Docs.
How to Vertically Align Text in Google Docs
- Open your document.
- Click Insert, then Table, then choose the 1 x 1 option.
- Right-click in the cell and choose Table properties.
- Check the box to the left of Minimum row height, then click inside the Minimum row height field.
- Enter a size that takes up the majority of the page.
- Click the Cell vertical alignment dropdown and choose Center, then click OK.
If you are working with a letter-sized document then a minimum row height of 8.5 inches or similar will be the ideal size. This paper size guide discussed more about that. Our article continues below with additional information on how to create and modify Google Docs tables.
Does your document have a picture that it doesn’t need? Our guide on how to remove images from Google Docs will show you how to get rid of that picture.
Working with Tables in Google Docs
Tables are great for organizing information in a visually pleasing and easy-to-understand way. They can also be used as presentation slides, making it super convenient when you need to present at your next meeting!
A table is the most basic and common type of tabular structure. It’s used to organize rows of information in a way that allows for straightforward reading.
The columns allow you to conveniently compare cells, while a row lets readers see how things might change over time or with changes elsewhere on paper without having to flip back pages (or screens).
A great example of this would be a spreadsheet – each column represents something different like costs incurred during production, sales revenue generated from those products sold at retail locations, number and types of employees hired, etc.
All shown as tables are laid out side by side so it can quickly show where profit-making opportunities lie when another possible variable is changed.
Luckily, Google Docs also allows its users to add tables to the document; here is how.
Inserting a Table in Google Docs
Adding a table to your Google document works in a similar manner to adding other document objects like an image. You can continue below to see how to add a table to your document. We also discuss other ways that you can customize and interact with your table once it has been created.
How to Insert a Table in Google Docs
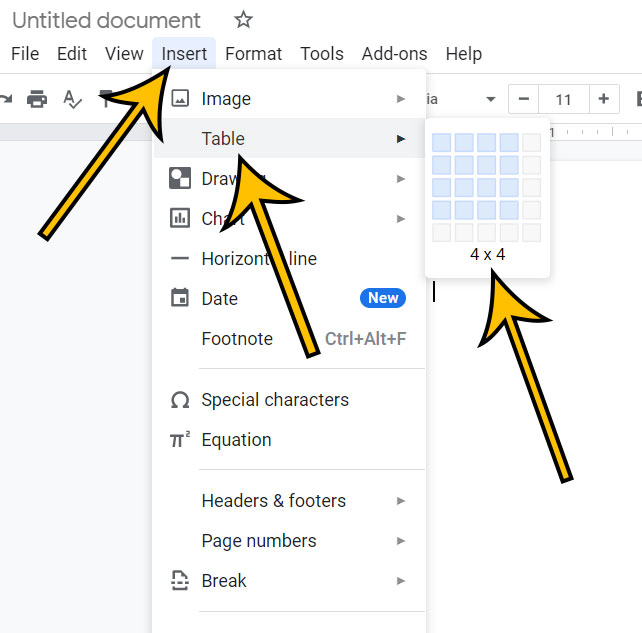
- Select where you would like the table to appear on your document.
- Click Insert in the top menu.
- Choose the Table option.
- Select the number of squares that represent the desired table layout.

The grid containing squares that appears after you choose the “Table” option is just the number of columns and rows that are n the initial table. You will be able to add more rows and columns to the table later if needed.
The maximum number of rows and columns that you can have in your table when creating it is 20. This means that the table can have a maximum of 20 rows and 20 columns. However, as mentioned earlier, you can add more rows and columns later.
The table is going to be inserted at the spot in the document where your mouse cursor is located. If the table is in the wrong spot then you can press Ctrl + Z to undo the table insertion then click at a different spot in the document and add the table again.
How to Delete a Table in Google Docs
If you have added a table to your document and found that you no longer need it, or if you want to display your data in a different way, then you may be wondering how to remove the table from your document.
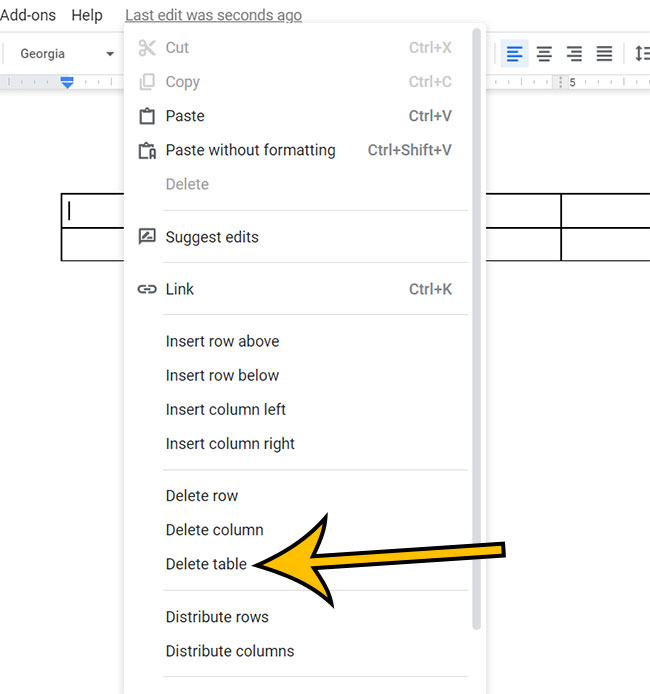
- Right click on a table cell.
- Choose the Delete table option.

This is going to delete the table structure as well as all of the data that was contained within the table cells.
How to Add Additional Rows to a Table
For adding additional rows.
- Right click the row above or below where you want the extra row.
- Select the Insert row above or Insert row below option.
Note that you can only add one row at a time, so you will need to do this multiple times if you need more than one new row at a time.
How to Add Additional Columns to a Table
If you want to add a column
- Right click the location next to which you would like to add a column
- On the pop-up window, select Insert column left to add a column on the left or Insert column right to add a column on the right.
As with the section above where we were adding rows, note that you are only going to be able to add one column at a time.
How to Delete a Row or Column from a Table
Occasionally you may end with more rows or columns in a table than you actually need. Fortunately the way to delete rows or columns is very similar to the method tht you used to add them.
- Drag your cursor to a column or row you intend to delete.
- On the pop-up menu, click the Delete row menu option to delete a row or Delete column menu option to delete a column.
- Confirm that the desired row or column has been deleted from the table.
How to Edit Table Properties
Google Docs has a variety of features to help you modify any existing table. It’s easy to make modifications like adjusting the color, border size, and alignment with the click of your mouse!
With Google Docs, it is possible to change the appearance or layout by changing properties such as a column’s width and a row’s height, vertical/horizontal alignments for text within cells in relation to other content on the page, or row spacing settings which can affect how much space appears between each line.
Some options allow users to specify font typeface family from their list of preset choices and select colors for various parts – headers & footers included.
How to Modify Dimensions of A Cell in a Google Docs Table
You can adjust borderlines of cells on Google Docs, which will, in turn, modify the dimensions of cells. Here is how.
- Drag your mouse to the borderline you intend to modify.
- As your cursor reaches the borderline, a kind of a double arrow will appear.
- Click the borderline with the double arrow.
- You will see a blue line, which is basically a guideline that will allow you to see the adjusted width and length.
- Without letting go of the mouse click, adjust the cell’s length and width according to your requirement.
- Release the mouse button once done.
How to Change Horizontal Cell Alignment
Keep your cells organized by changing their horizontal alignment. With Google Docs, you can select one of four different alignments in the toolbar.
- Left Side Alignment
- Center Horizontal Alignment
- Right Side Vertical Alignment.
- Justify
The following steps will help you change the horizontal alignment of cells. Pay attention when selecting cells in the table. Pay special attention to cells you select, as any changes you make will only be applied to cells you have chosen.
- Choose a cell or multiple cells you intend to align.
- Select the desired alignment setting from the toolbar above the document.
- Confirm that the selected cells have been aligned as desired.
Modifying Vertical Cell Alignment
The alignment of cell contents to the top, middle or bottom area of a cell is referred to as the vertical alignment of a cell.
The below-mentioned steps are going to help you make changes to a cell’s vertical alignment. Vertical alignment can be applied to multiple numbers of cells.
Here’s how you can vertically align a cell.
- First, select the cells you intend to align vertically.
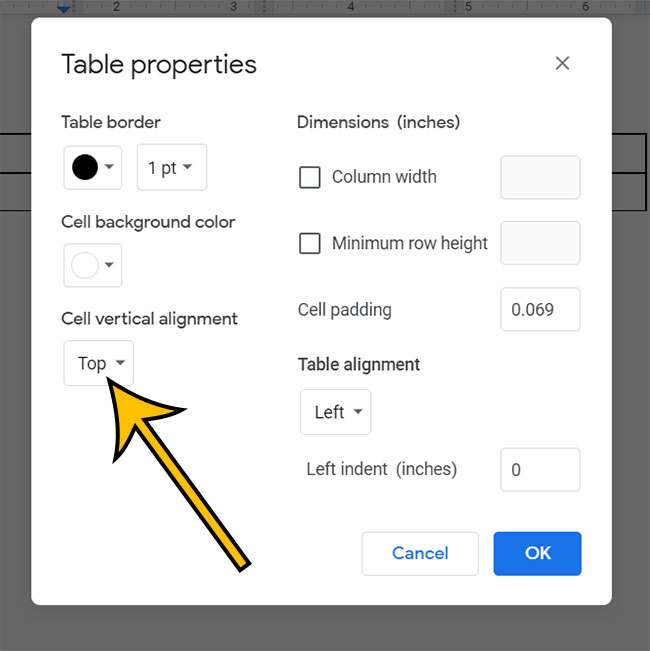
- Next, from the dialogue box that will appear, select Table properties.
- This will open up a Table properties dialogue box or a column at the right side of the window. Here you can click the Vertical cell alignment box.
- Select alignment as per your requirements.
- Once selected, click OK.

Please be careful when selecting cells in the table. It is essential to adjust vertical alignment, and any changes that you make will only apply to those selected cells, so be careful when selecting your desired cell. If you’ve already changed some of the settings but want them back at their original setting, later on, select all of the rows/columns before changing any more things or else they may get mixed up with other areas unintentionally!
Modifying Border Size
To make modifications to the border size of your Google Docs table you can follow the steps below.
- Click the table and select Table Properties in the dialog box that appears.
- Click the Table border width dropdown menu and choose the desired border size.
- Click on OK for the changes to take effect.
Changing Cell Background Color
To change the cell background color for one or some of the cells in your Google Docs table you can use the steps below.
- Choose the cells for which you wih to change the background color.
- From the pop-up menu, select Table properties.
- When you see a Table Properties dialogue box appear, select the Cell background color drop-down menu and choose your desired color.
- Click OK for the changes to take effect.
Modifying Border Color
To modify the color of the border that is being used on your Google Docs table you can follow these steps.
- Right click the table and select Table Properties in the pop-up dialog box.
- You will see the Table properties dialog box open at the center of the window.
- Go to the Table border color drop-down arrow and click to select your required color.
- Click OK for the changes to take effect.
Aligning The Text in The Middle Of The Page
To align the text in the middle of the page on Google Docs, follow the instructions below.
- Click the entire text you intend to centre align.
- Now go to the Google Docs toolbar and look for the Center align button.
- With the text selected, click the Center align button for the changes to take effect.
Or,
If you intend to align the text into the middle of the page, you also can follow this other method to central align your text
- Select the text you intend to centre align
- Choose the Format option from the menu at the top of the window.
- Select Align & indent and click on Center.
Frequently Asked Questions About Vertical Alignment – Google Docs
Where do I find the cell vertical alignment box?
If you are trying to modify vertical cell alignment in a Google Docs table, then you will need to go right-click on a cell in the table, then click Table properties to start editing table properties.
You will need to then expand the Alignment section at the right side of the window and click the Cell vertical alignment drop down menu to align text vertically.
Can I change vertical alignment and center vertically in the page setup section of Google Docs?
No, unfortunately there is not an option to modify vertical text alignment through the format menu where you can change the right and let margin, or the top and bottom margins.
You can only vertically center the page layout in Google Docs if you are working with tables.
Final Thoughts on Google Docs Vertical Alignment
Tables are a great way to organize data, and Google Docs makes them easy. You can insert tables into your docs as needed or create one from scratch on the fly by clicking “Insert Table.”
Once you have created your table, Google Docs offers several ways to customize it according to your needs.
For example, if you want all of the rows to be identical in height across every column (think name badges at an event), click “Format” then “Table,” select “Fixed Column Width”, and set its value to 100%.
This will make sure each row’s width remains consistent throughout the document. We hope this article has helped with making sense of how tables work within Google.
If you’re looking to create a project plan, Google Docs is the way to go! It’s easy and convenient – just what today’s busy professionals need.
You can also customize it with your company branding or logo so that everything looks professional when presenting at meetings.
Matthew Burleigh has been writing tech content online for more than ten years. He enjoys writing about Google Docs in addition to many other applications and devices and has cumulatively covered Google’s word-processing application in hundreds of different articles.
He has been published on dozens of popular websites, and his works have accumulated millions of pageviews.
While focused primarily on tutorials and guides for popular electronics like the iPhone and iPad, as well as common applications like Microsoft Word, Powerpoint, and Excel, he covers topics across the entire technology spectrum.
You can read his bio here.