
Sometimes when you are creating a document in Google Docs, you need to use some pretty specific formatting.
This could involve margins, or page numbers, but it may also apply to the way that your works cited page need to look.
Our tutorial below will show you how to do a hanging indent on Google Docs if that’s a requirement for your project.
How to Create a Hanging Indent in a Google Doc
- Open your Google Docs file.
- Select the line.
- Choose Format.
- Click Align & indent.
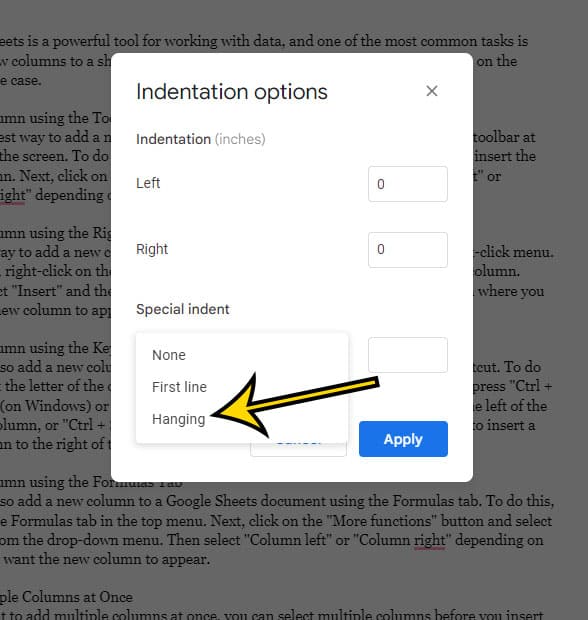
- Select Indentation options.
- Click the Hanging option below Special indent and enter a size.
- Choose Apply.
Our guide continues below with additional information on how to use this style of formatting.
If there is text in a document with a line across it that you want to change, find out how to remove strikethrough in Google Docs.
In word processing programs like Google Docs and Microsoft Word, a hanging indent is a formatting choice that will automatically add a left indent to a paragraph while leaving the initial line in its original position.
It is one of the application’s lesser-known yet crucial functions, along with others like subscript in Google Docs.
When using a standard indentation setting, the first line will typically be indented instead of the subsequent lines in the paragraph, which will be applied off the left margin.
However, some circumstances, such as on a works cited page, may necessitate that the indent begin on the second line of the paragraph instead due to formatting guidelines from organizations like the MLA.
The procedures in the above guidance make use of the Google Docs software from the Google Apps suite to help you swiftly indent your entire paragraph while leaving the opening line of a paragraph in place and modify your indentation settings.
How to Use the Hanging Indent Option in Google Docs
Once you have completed this section, you will have a part of your document that is formatted with a hanging indent.
Step 1: Open your Google Docs document.
Step 2: Click at the beginning of the line you want to indent.
Step 3: Select Format at the top of the window.
Step 4: Choose Align & indent from the dropdown menu.
Step 5: Click the Indentation options item.
Step 6: Select the Special indent dropdown menu, then choose the Hanging option.
Step 7: Enter a size for the hanging indent, then click the blue Apply button.
Now that you know how to do a hanging indent on Google Docs, you will be able ot navigate to this menu and utilize the additional indentation tools in the application.
More Information About Google Docs Hanging Indents
After applying the hanging indent, a blue triangle in the ruler will show the location of the left indent. The initial line indent marker will also have a blue rectangle next to it.
Go to View > Show ruler to enable the rulers if you can’t see them on your document.
Check out the margin settings under File > Page configuration if you need to have more control over the margins in your work.
You must frequently double-space your paper while using MLA format. By selecting the Double option under Format > Line spacing, you may find that value.
Another method to add this kind of indentation is to pick the paragraph you want to format, then drag the Left indent icon (the blue triangle that is upside down) until the indentation is the right size.
The First line indent icon (the tiny blue rectangle) can then be moved back to the left margin.
You may use either the ruler approach or the Indentation choices method to apply the hanging indent to several paragraphs in a Google Doc by first clicking and dragging to pick all of the required paragraphs.
When producing hanging indents, a drop-down menu will open with options for alignment and indentation like:
Right align
center align
Left align
Indent the text more or less
Even while the hanging indent option makes it simple for you to indent the second and succeeding lines for numerous citation entries or other sections of your document, these choices let you rapidly change certain formatting to replicate the hanging indent appearance.
Questions and Answers Regarding How to Create a Hanging Indent in Google Docs
In Google Docs, how do you make a hanging indent?
By opening the document in Google Docs and then selecting the location in the document where the indent should be added, you can create a hanging indent. After that, you can select Hanging under Format > Align & indent > Indentation choices. The dangling indent’s size can then be specified. When finished, press the OK button.
A Hanging Indent is what?
An alternative formatting choice known as a hanging indent places the initial line of a paragraph along the left margin of the document before the remainder of the paragraph is indented.
The initial line of a paragraph must be selected in Google Docs in order to generate a hanging indent. Then, proceed as instructed in the aforementioned instruction.
You will have the option to decide how much room you want to utilize for the dangling indent during the procedure.
In Google Docs, can I get rid of a hanging indent?
You can eliminate a dangling indent in your document, as you can with the majority of formatting settings you will use.
In Google Docs, you must first click somewhere within the paragraph that has the dangling indent in order to delete it.
Then, select the None option from the Special Indent drop-down menu under Format > Align & Indent > Indentation choices. To make the adjustment, click OK after that.
Why would a hanging indent be necessary?
Making citations is one typical situation where people need to use hanging indents in their writing.
Your school or place of employment may utilize any of the following style manuals:
- Chicago Manual of Style
- APA (American Psychological Association)
- MLA (Modern Language Association)
Although each of these style manuals has its own citation guidelines, it’s typical to need to indent the initial line of your reference, which you may do in Google Docs by using a hanging indent.
The formatting of your cited works may also need the usage of hanging indents if you are also compiling a bibliography for your paper.
Although you can obtain a similar effect by leaving blank spaces, you’ll find that using the hanging indent style makes it much simpler to make sure that everything is done correctly.
What is a hanging indent’s typical depth?
Make sure the size is set to .5 if you want to ensure that the hanging indent you are making adheres to the recommended settings.
When working with situations in formats like APA, MLA, or Chicago Style, this is the most popular choice.
What purpose do hanging indents serve?
While there are many uses for indents like this, citations and reference lists are the most popular choice.
They offer a quick and easy approach to make individual citations appear to be unique from one another and make it simpler for readers to understand how each item in a list differs from the one before it or after it.
How do I add a hanging indent to a document in Microsoft Word?
You might need to align text in other word processing programs as well, such as Microsoft Word.
Word does include a Paragraph Settings dialog box with such an option, despite not having an Indentation Options window like Google Docs.
Step 1: Launch Microsoft Word, open your document, and then pick the paragraph to which you wish to add a hanging indent.
Step 2: Select the paragraph option by right-clicking on the selection.
Step 3: Select the Hanging option from the drop-down menu under Special.
Step 4: Click “OK.”
Alternative Technique for Hanging Indents in Google Docs
The ruler can also be used to insert a hanging indent into one of your document’s paragraphs.
Step 1: First, pick Show ruler from the View menu at the top of the screen.
Keep in mind that if the ruler is already visible above the paper, you don’t need to do anything.
Step 2: To indent the paragraph, click inside of it.
Step 3: To place the indentation where you want it, click and drag the down arrow on the ruler.
Step 4: Reposition the blue rectangle to where it was before.
Now, you ought to have a blue rectangle and a left indent marker that resemble the illustration below.
If you’re using Google Docs on a mobile device, read on for further instructions on how to insert a hanging indent.
How to Insert Hanging Indents in Google Docs on an Android or iPhone
A surprising number of the tools you will find and utilize in Google Docs on your PC are also included in the Google Docs app, which is accessible on iPhone and Android devices.
If you want to do it through the mobile app, but one of those alternatives isn’t a hanging indent, you’ll need to use a workaround.
Step 1: First, open the Google Docs application and select the document you want to modify.
Step 2: Tap the pencil symbol located in the bottom right corner of the screen.
Step 3: Double-tap at the start of the paragraph’s second line.
You might also position your cursor at the end of the previous line and click “Enter” to begin a new line.
Step 4: Tap the screen’s top-right, underlined “A” icon.
Step 5: Choose the Paragraph tab in step five.
Step 6: Select the option for Right indent.
Now in your document, you should have a paragraph with the first line aligned to the left margin and the other lines indented to the right.
Your document should have the proper indentation pattern if you followed our instructions for adding a hanging indent on Google Docs mobile above.
Matthew Burleigh has been writing tech content online for more than ten years. He enjoys writing about Google Docs in addition to many other applications and devices and has cumulatively covered Google’s word-processing application in hundreds of different articles.
He has been published on dozens of popular websites, and his works have accumulated millions of pageviews.
While focused primarily on tutorials and guides for popular electronics like the iPhone and iPad, as well as common applications like Microsoft Word, Powerpoint, and Excel, he covers topics across the entire technology spectrum.
You can read his bio here.