
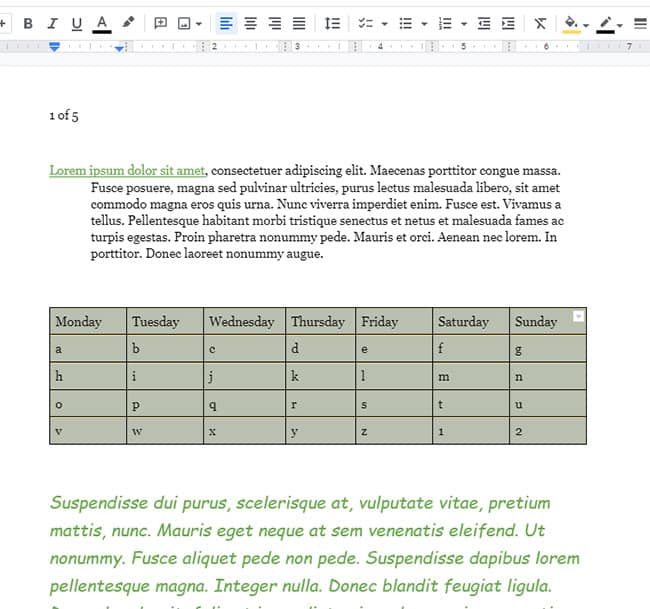
Adding a table to a Google Docs file can be a great way to display information in a more digestible way for your audience.
But it’s pretty common to put the table in the document, only to discover that it would work better in a different part of that document.
Our tutorial below will show you how to move a table in Google Docs with just a few short steps.
How to Put a Google Docs Table in a Different Part of the Document
- Open your Docs file.
- Select the table.
- Click and drag the table to the desired location.
- Release the mouse button.
Our guide continues below with additional information on relocating a table, including pictures of these steps.
How to Reposition a Google Doc Table
Moving a table in Google Docs is a simple task that can be done in just a few steps. Whether you’re creating a document from scratch or editing an existing one, you can easily move a table to a different location in the document. Here’s how to do it:
Step 1: Select the table you want to move.
You can do this by clicking and dragging your mouse over the table.
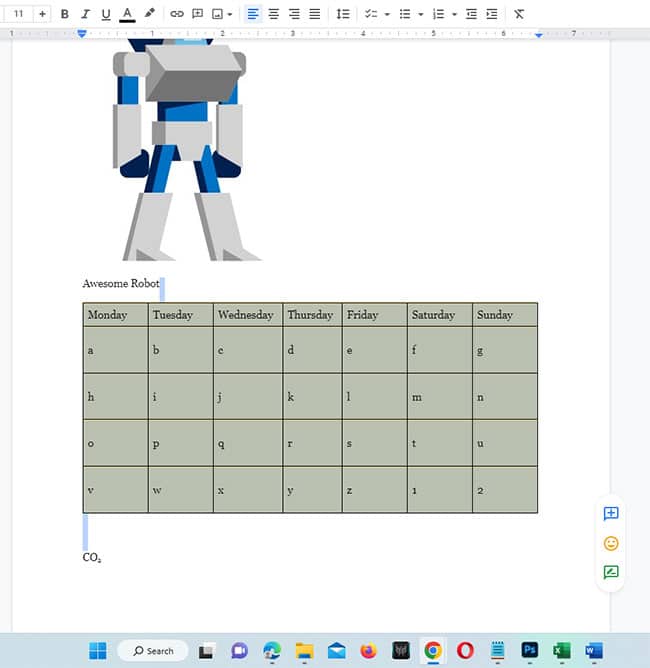
Step 2: Once the table is selected, click and hold the mouse button down while you drag the table to its new location.
Note that there will be a blue cursor on the screen to indicate the insertion point for the table.
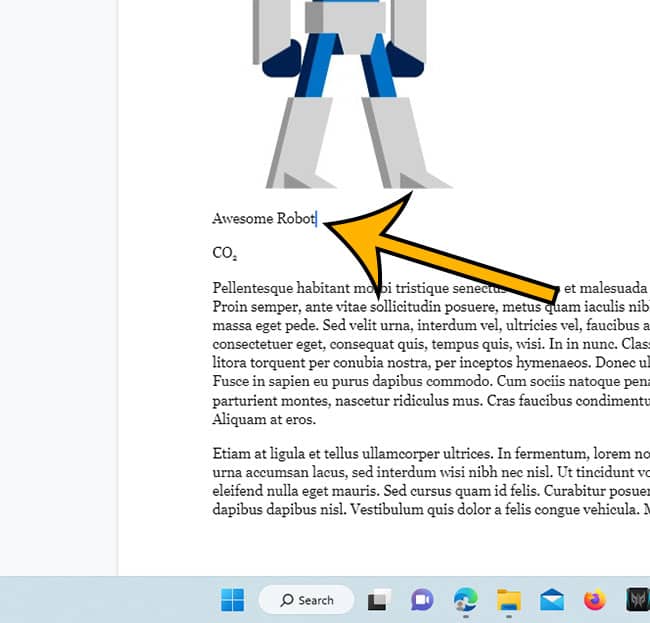
Step 3: Release the mouse button when you’ve reached the desired location.
The table will now be in its new spot.
That’s all there is to it! Moving a table in Google Docs is a quick and easy process that can help you organize your documents more efficiently. With just a few clicks, you can rearrange your tables and make sure your document looks exactly how you want it to.
Now that you know how to move a table in Google Docs, you might be interested in ways that you can change things about that table.
How to Edit a Google Docs Table
If you’re looking for a quick way to update a table in Google Docs, you’ve come to the right place. Here, we’ll show you how to add rows and columns, merge or split cells, and modify the table’s style to suit your document’s layout.
Adding Columns and Rows
To add a row or column, simply click anywhere inside the table. This will open up the “Table” menu at the top of your document.
From there, select either “Insert Column Before” or “Insert Row Above” to add a column or row respectively.
You can also right-click anywhere inside the table and select the same options to add a column or row.
Merging and Splitting Cells
To merge two or more adjacent cells, simply select the cells you want to merge.
From the “Table” menu at the top of your document, select “Merge Cells.” This will combine the contents of all selected cells into one cell.
If you want to split a cell, select the cell you want to split. Then, from the “Table” menu at the top of your document, select “Split Cells.” This will create two new cells in place of the one you selected.
Modifying Table Style
You can easily change the style of your table by clicking anywhere inside the table.
Then, from the “Table” menu at the top of your document, select “Table Properties.”
This will open a window where you can customize various aspects of your table’s style, including its background color, border thickness and style, and alignment.
How to Center a Table in Google Docs
If you’re looking to add a bit of visual flair to your Google Docs document, one of the easiest ways to do so is by centering a table. Centering a table can help draw attention to important information and make your document look more professional. In this blog post, we’ll show you how to center a table in Google Docs.
First, open your Google Docs document and select the table you want to center. You can do this by clicking on the table or by using the arrow keys to move the cursor to the table. Once you’ve selected the table, click on the “Table” menu at the top of the page. This will open a drop-down menu with several options.
Next, select the “Align” option from the drop-down menu. This will open a sub-menu with several alignment options. Select the “Center” option from this sub-menu. This will center your table in the document.
Finally, if you want to make sure that your table is centered correctly, you can use the “View” menu at the top of the page. Select the “Show Ruler” option from this menu. This will open a ruler at the top of the page that will show you exactly where your table is centered.
And that’s it! Centering a table in Google Docs is a quick and easy way to add some visual flair to your document. With just a few clicks, you can make your document look more professional and organized.
How to Put Two Tables Next to Each Other in Google Docs
If you have two separate tables in your document and you would like to display them next to one another, then you need to change some of the alignment settings for those objects.
Step 1: Open the Google Doc containing the two tables you want to arrange side by side. Resize the tables to the desired size by clicking and dragging the borders of the tables.
Step 2: Click between the two tables.
The cursor should now be positioned within a black “crosshatch” area between the tables. Right-click on this area and select the “Table Properties” option from the menu that appears.
Step 3: Select the “Table Position” tab from the Table Properties dialog box. Click the “Alignment” field to the right of this tab and then choose “Left” or “Right,” depending on which side of the document you want your tables to appear.
Step 4: Click the “Advanced” field to the right of this tab and select the “Absolute Positioning” option from the drop-down menu.
This will allow you to place the two tables anywhere in your document as opposed to flowing with surrounding text.
Step 5: Select the “Vertical Alignment” field and choose “Top” or “Bottom,” depending on where you want the two tables to start in relation to each other.
Step 6: Click the “OK” button in the Table Properties dialog box.
The two tables should now be side by side in the document.
Conclusion
Editing a table in Google Docs is easy and straightforward. With just a few clicks, you can add rows and columns, merge or split cells, and modify the table’s style to suit your document’s layout. We hope this guide has helped you become more confident with editing tables in Google Docs!
Matthew Burleigh has been writing tech content online for more than ten years. He enjoys writing about Google Docs in addition to many other applications and devices and has cumulatively covered Google’s word-processing application in hundreds of different articles.
He has been published on dozens of popular websites, and his works have accumulated millions of pageviews.
While focused primarily on tutorials and guides for popular electronics like the iPhone and iPad, as well as common applications like Microsoft Word, Powerpoint, and Excel, he covers topics across the entire technology spectrum.
You can read his bio here.